AMD-Xilinx Versal ACAP and Versal NET boards
Instructions below show how to run OP-TEE on Versal ACAP and Versal NET boards. Explicitly tested and mentioned are the VCK190 Versal ACAP development board, and the VNX B2197 Versal NET board.
Details on Versal ACAP devices can be found in the Versal Adaptive SoC Technical Reference Manual (AM011). For Versal NET devices it is the Versal NET Technical Reference Manual (AM021, NDA required).
Supported PLM Firmware
On any Versal device almost all security hardware is to be accessed indirectly via the Platform Management Controller (PMC) and its PLM Firmware and not in a direct, memory-mapped fashion. Thus this OP-TEE port heavily depends on the interface to PLM Firmware, which can be changed by AMD-Xilinx from release to release in incompatible ways.
The Versal OP-TEE port is currently based on AMD-Xilinx PLM Firmware release 2024.2, only.
Another important dependency in terms of interfaces is the ARM Trusted Firmware, which is changing its interface far less often than the PLM Firmware interface is changed. This port is based AMD-Xilinx release 2024.2, which is based on ARM Trusted Firmware 2.10.0.
Supported Boards
This port of OP-TEE should be applicable to all other boards based on Versal ACAP (like VMK180) or Versal NET. In most cases, regarding OP-TEE OS, the main difference lies in selecting the right PS UART peripheral(s) out of two available ones for console output. All other hardware peripherals used by this port are integral components of the respective devices.
Prerequisites
The user is required to provide a Board Support Package (BSP) as an input to the OP-TEE build system. Such a BSP in context of this OP-TEE port comprises at least:
a Programmable Device Image (PDI,
.pdifile): settings, low level firmware(s) and other startup files for various components, next to a bitstream for the Programmable Logic (PL) of Versal devices; anda matching Device Tree Blob (DTB,
.dtbfile) for U-Boot and Linux.
Attention
Bootable PDI files generated by the AMD-Xilinx toolchain include a PLM Firmware executable that, by default, lacks certain security related features required or at least recommended by this Versal OP-TEE port. This also applies to executables produced by PetaLinux.
Consequently, code has been included to automatically build and use compatible PLM Firmware executables. See section Build options on how to generate custom firmware when invoking the build system.
Depending on Versal ACAP or NET, such a BSP may come in two major forms:
For Versal ACAP boards
Usually a Versal ACAP board comes with a AMD-Xilinx PetaLinux BSP (or, alternatively, a fully built PetaLinux project). See Downloads, section Versal Adaptive SoC Board Support Packages. For example file
xilinx-vck190-v2024.2-11110212.bspfor the VCK190 board.To use (extract) such a PetaLinux BSP, download PetaLinux (also Downloads, section PetaLinux Tools - Installer) and install it.
Note
You will need a free AMD-Xilinx account to proceed with the two previous steps.
For Versal NET boards
A Versal NET board typically comes with a subset of such a PetaLinux BSP: a set of two files, as mentioned above. These are available upon request from your AMD-Xilinx FAE:
versal-net-bspfolder with:design.pdiBootable PDI as produced by AMD-Xilinx toolchain; suitable for operating all security hardware, especially the PKI Accelerator.
design.dtbDTB for U-Boot and Linux; especially for selecting the correct UART and reserving space for OP-TEE memory through
reserved-memorynodes.
Configuring and building
Fetching source code
For Versal boards:
$ mkdir optee-project
$ cd optee-project/
$ repo init -u https://github.com/OP-TEE/manifest.git -m versal.xml
$ repo sync -j4 --no-clone-bundle
For Versal NET boards:
$ mkdir optee-project
$ cd optee-project/
$ repo init -u https://github.com/OP-TEE/manifest.git -m versal_net.xml
$ repo sync -j4 --no-clone-bundle
This shall have created a new working directory optee-project/ with all the
repositories required with the exception of a directory for a BSP.
Adding BSP
The BSP can be provided in one of two major forms:
A PetaLinux BSP (
.bsp) file (or an existing, fully built PetaLinux project directory).Note
This form of providing the BSP is common for Versal ACAP boards and rather uncommon for Versal NET boards.
A prerequisite for unpacking a BSP file (or building a PetaLinux project) is install ing PetaLinux as previously mentioned.
To unpack a PetaLinux BSP file:
$ cd optee-project/
$ bash
$ source <path-to-petalinux>/settings.sh
$ petalinux-create project -s <path-to-bsp-file> -n versal-bsp
$ exit
For Versal NET use
-n versal-net-bspinstead of-n versal-bsp.The
petalinux-createcommand creates a new subdirectory inoptee-project/according to the argument passed to the-noption, which then comprises a pre-built PetaLinux project (subdirectorypre-built/).The build system will pick up this BSP directory automatically.
A set of two files - a Bootable PDI file, as produced by AMD-Xilinx toolchain and an appropriate DTB file to be used with U-Boot and Linux.
To make the build system pick up these two files automatically place them in a new directory called
versal-net-bspfor Versal NET device orversal-bspVersal ACAP with namesdesign.pdianddesign.dtb:$ cd optee-project/ $ mkdir versal-net-bsp $ mv -iv <path-to-boot-pdi> versal-net-bsp/design.pdi $ mv -iv <path-to-dtb> versal-net-bsp/design.dtb
Note
This form of providing the BSP is especially common for Versal NET boards. Of course it may also be used for Versal ACAP boards.
Preparing toolchains
$ cd optee-project/build/
$ make -j8 toolchains
This shall have created a toolchains directory within the optee-project/
working directory with all the required ARM cross-compile toolchain executables.
Building the bootimage
To build a bootable image, execute the following commands:
$ cd optee-project/build/
$ make -j8 bootimage
This will build ARM Trusted Firmware and OP-TEE with output on PS UART0 by default. See the next section Build options for further settings.
Note
Both, the VCK190 and the VNX B2197 boards have at least PS UART0 accessible.
After make has finished a bootable image shall be available at
optee-project/build/versal/BOOT.BIN. This bootable image comprises all
components, including the Linux kernel and a minimal root filesystem (as
initramfs) with OP-TEE Linux userspace tools like xtest.
Build options
The versal.mk Makefile in optee-project/build/ accepts the following
build options in the form of environment variables or command line make
variable assignments:
VERSAL_UART1=yTo build ARM Trusted Firmware and OP-TEE for output on PS UART1 instead of UART0 set
VERSAL_UART1=yas shown below.$ cd optee-project/build/ $ make -j8 VERSAL_UART1=y bootimage
Note
The UART chosen by setting or not setting VERSAL_UART1 to y is
called the primary UART in this document.
VERSAL_UART2ND_OPTEE=ySince the Processing System (PS) of Versal devices comes with 2 UART instances, there may be the possibility for a secondary accessible UART. Obviously this depends on the board the Versal device resides on - whether both UARTs are physically accessible or not.
secondary UART means PS UART1 if
VERSAL_UART1is unset (orn) and PS UART0 ifVERSAL_UART1=y.To exclusively use the secondary UART for OP-TEE OS output use
VERSAL_UART2ND_OPTEE=y.BSP_PATH=<path-to-petalinux-project-directory>The path to an extracted PetaLinux BSP file (or a fully built PetaLinux project) to take the various boot files from can be specified with
BSP_PATH. The Makefile looks for the following components as they are the usual build results of PetaLinux:Bootable PDI (
project-spec/hw-description/*.pdi)PLM Firmware executable (
{images/linux,pre-built/linux/images}/plm.elf)PSM Firmware executable (
{images/linux,pre-built/linux/images}/psmfw.elf)DTB (
{images/linux,pre-built/linux/images}/system.dtb)
Setting
BSP_PATHis the typical use case when the BSP is *not placed in in directoryoptee-project/versal-bsp/for Versal ACAP andoptee-project/versal-net-bsp/for Versal NET respectively.PDI_PATH=<path-to-pdi-file>,DTB_PATH=<path-to-dtb-file>Instead of being searched for via
BSP_PATHthe required Bootable PDI file and DTB can be specified directly usingPDI_PATHandDTB_PATH.Setting
PDI_PATHandDTB_PATHis the typical use case when there no PetaLinux BSP (or fully built PetaLinux project) available.If neither
BSP_PATH, norPDI_PATHand/orDTB_PATHare specified, the build system looks for files calleddesign.pdiand/ordesign.dtbin directoryoptee-project/versal-bsp/for Versal ACAP andoptee-project/versal-net-bsp/for Versal NET.PLM_PATH=<path-to-plm-elf>,PSM_PATH=<path-to-psm-elf,CROSS_COMPILE_FIRMWARE=<path-to-mb-gcc>Warning
Do not execute the
makecommand from within an active Vitis or PetaLinux environment! If needed (see below) determine the absolute path to the Microblaze GCC executable and use that path as-is for settingCROSS_COMPILE_FIRMWARE.Usually the new bootable image is built either …
reusing the PLM and PSM Firmware executables included in the given PDI file (as produced by Vitis toolchain), or
using the ones produced by PetaLinux, if a PetaLinux BSP is available.
Instead the Makefile allows the user to either …
point to preexisting PLM and/or PSM Firmware ELF files using
PLM_PATHand/orPSM_PATH. There is no need to setCROSS_COMPILE_FIRMWAREin this case, orlet the build system generate new, custom PLM and/or PSM Firmware ELF files from scratch using the clone of AMD-Xilinx embeddedsw repository and its Building from Git flow.
This can be necessary to have all desirable security features enabled, since the default PLM Firmware as generated by Vitis or PetaLinux toolchain usually lack the following features (see xparameters.h):
Inclusion of module XilNVM (remove
PLM_NVM_EXCLUDE).Attention
Without module XilNVM accessing the Versal chip’s DNA is not possible. The DNA is required by OP-TEE to derive the Hardware Unique Key. Consequently, the Secure Storage subsystem will not work!
Inclusion of module XilPUF (remove
PLM_PUF_EXCLUDE).NIST Curves P256 and P521 (add
XSECURE_ECC_SUPPORT_NIST_{P256,P521})Versal ACAP: Save code size due to limited PMC RAM by disabling boot from QSPI and OSPI (add
PLM_{QSPI,OSPI}_EXCLUDE), and debug prints (replacePLM_DEBUGbyPLM_PRINT).
Set variables
PLM_PATH=generateand/orPSM_PATH=generate, and set variableCROSS_COMPILE_FIRMWAREto the path of the Microblaze GCC compiler executable. In the installation of Vitis, compiler can usually be found in:$XILINX_VIVADO/gnu/microblaze/lin/bin/mb-gccIn the installation of PetaLinux, it can usually be found in:
$PETALINX/components/xsct/gnu/microblaze/lin/bin/mb-gccNote
Just like ARM Trusted Firmware, when built from scratch, PLM and PSM Firmware are configured to output on the primary UART (PS UART0 if
VERSAL_UART1is unset ornand to output on PS UART1 ifVERSAL_UART1=y).
IUB_BIF_PATH=nBy default the bootable image (
optee-project/build/versal/BOOT.BIN) comprises all components, including a U-Boot FIT image (i.e.optee-project/build/versal/versal-vck190.ub), which comprises the Linux kernel binary, the root filesystem (initramfs) image and various DTBs for Linux. At the same time the default “boot command” built into U-Boot is modified to explicitly load this U-Boot FIT Image.By setting
IUB_BIF_PATH=nthe generated U-Boot FIT Image is not included in the bootable image. Furthermore ifIUB_BIF_PATH=nthe default “boot command” built into U-Boot is not modified anymore.Not including the U-Boot FIT Image makes the bootable image significantly smaller, of course, which can be beneficial when there are other means than (slow) JTAG to load it.
Note
As a consequence, after having loaded such a reduced bootable image, for example via JTAG, it is up to the user to also load the U-Boot FIT image into memory and operate the U-Boot console to run it.
Loading the U-Boot FIT Image into memory separately may be done from an SD card or via network (TFTP) for example.
Booting the image
Note
The instructions in this part assume that build option IUB_BIF_PATH=n
has not been set.
JTAG Boot to Linux
Note
The commands in this section are supposed to be executed within an active
Vitis or PetaLinux environment with appropriate environment variables set to
locate xsdb (e.g $PATH in case of Vitis and $PETALINUX in case
of PetaLinux). PetaLinux can be downloaded and install ed from the
AMD-Xilinx website (Downloads).
The user that runs these executables must have the correct UNIX access
rights to open the underlying USB device node(s) related to UART and JTAG
towards the board. Regarding UART devices most of the time adding said user
to the dialout UNIX group is enough on Ubuntu/Debian-based
systems. Regarding the JTAG server hw_server the Vitis installer usually
guides the user to install appropriate udev rules.
To load and execute the bootable image
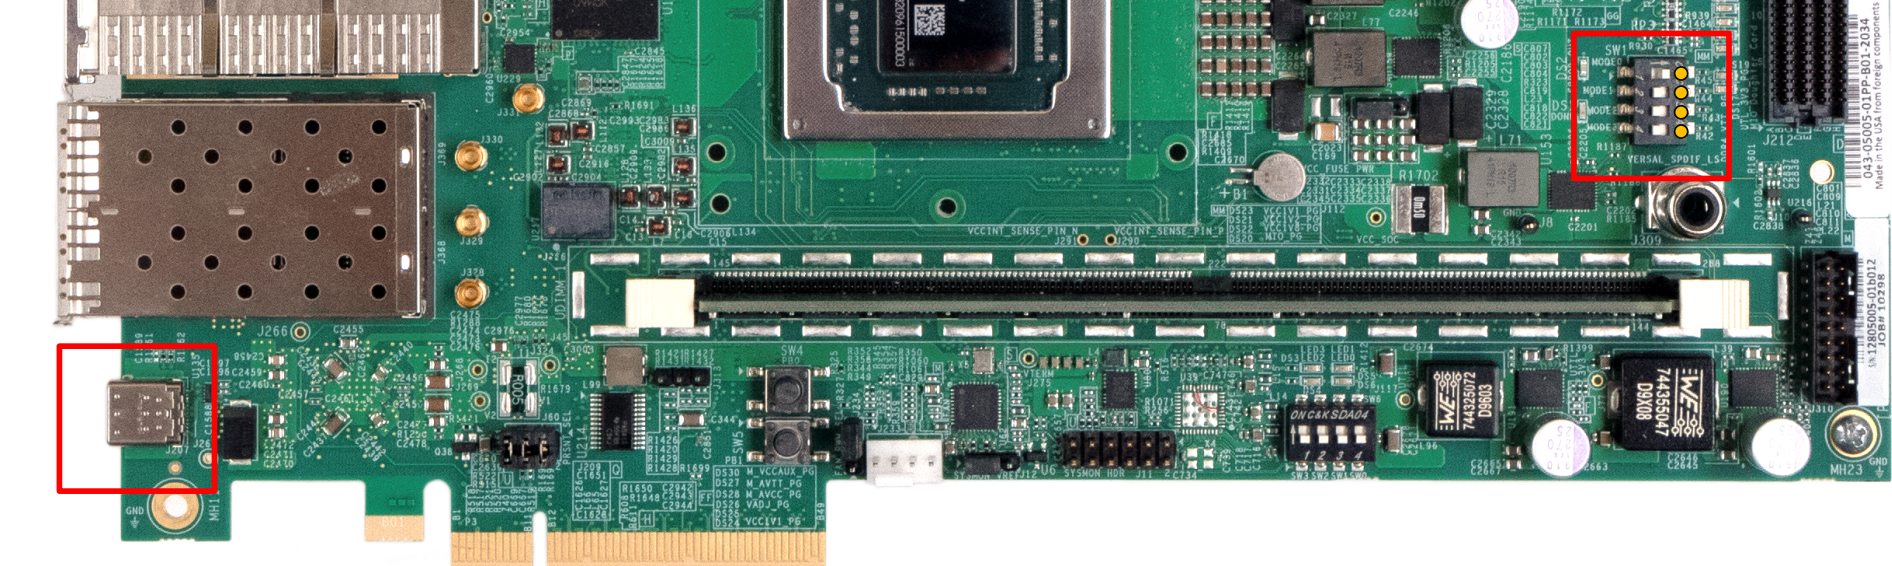
BOOT.BINvia JTAG, configure Versal boot mode switches for JTAG and then power up the board.In case of the VCK190 board see the figure below. The boot mode switches are marked in red on the right hand side (zoom in!):
Then run the
optee-project/versal/boot_jtag.shscript:$ cd optee-project/ $ ./build/versal/boot_jtag.sh
This script will locate and start the tool
xsdb, automatically start a localhw_serverinstance, force boot mode to JTAG, trigger a reset and finally download and execute the bootable image on the Versal board (xsdbcommanddevice program).Hint
Alternatively, to specify a remote and already started
hw_serverinstance on$HOST, listening on port$PORT(default: 3121) use option-u. Example:$ cd optee-project/ $ ./build/versal/boot_jtag.sh -u tcp:$HOST:$PORT
Hint
To get a progress indication while the bootable image is being loaded by
xsdband drop to the interactive TCL shell after loading has finished, use option-i.Shortly after
boot_jtag.shshows the following output, PLM (and PSM) Firmware messages shall appear on the primary UART.$ cd optee-project/ $ ./build/versal/boot_jtag.sh Selecting target Versal Clear PMC_MULTI_BOOT register (0x00f1110004 = 0x0) Switch to JTAG boot mode, BOOT_MODE_USER register (0x00f1260200 = 0x0100) Selecting target PMC Reset system Selecting target Versal Loading BOOT.BIN
PLM Firmware messages shall be followed by startup messages from ARM Trusted Firmware, OP-TEE OS, then U-Boot and finally Linux.
When Linux has completed its boot sequence, the user may login as
rootwithout any password. All OP-TEE services should have been started at this point and the user may run thextesttool to run OP-TEE test suite(s):OP-TEE embedded distrib for versal-net-vnx-b2197-revA buildroot login: root # xtest
SD card boot to Linux
If the board offers an SD card slot (i.e. VCK190):
Prepare an SD card with a single bootable partition large enough to hold the bootable image
BOOT.BIN.Using
gpartedor any other partition manager tool create a single partition on the card (remember to flag it as bootable)1GB FAT32 bootable partition (i.e:
/dev/sdc1).
Once the SD card is partitioned and the first partition is formatted, mount it on your file system and copy the image:
$ cp optee-project/build/versal/BOOT.BIN <mount_point>/
$ sync
$ umount <mount_point>
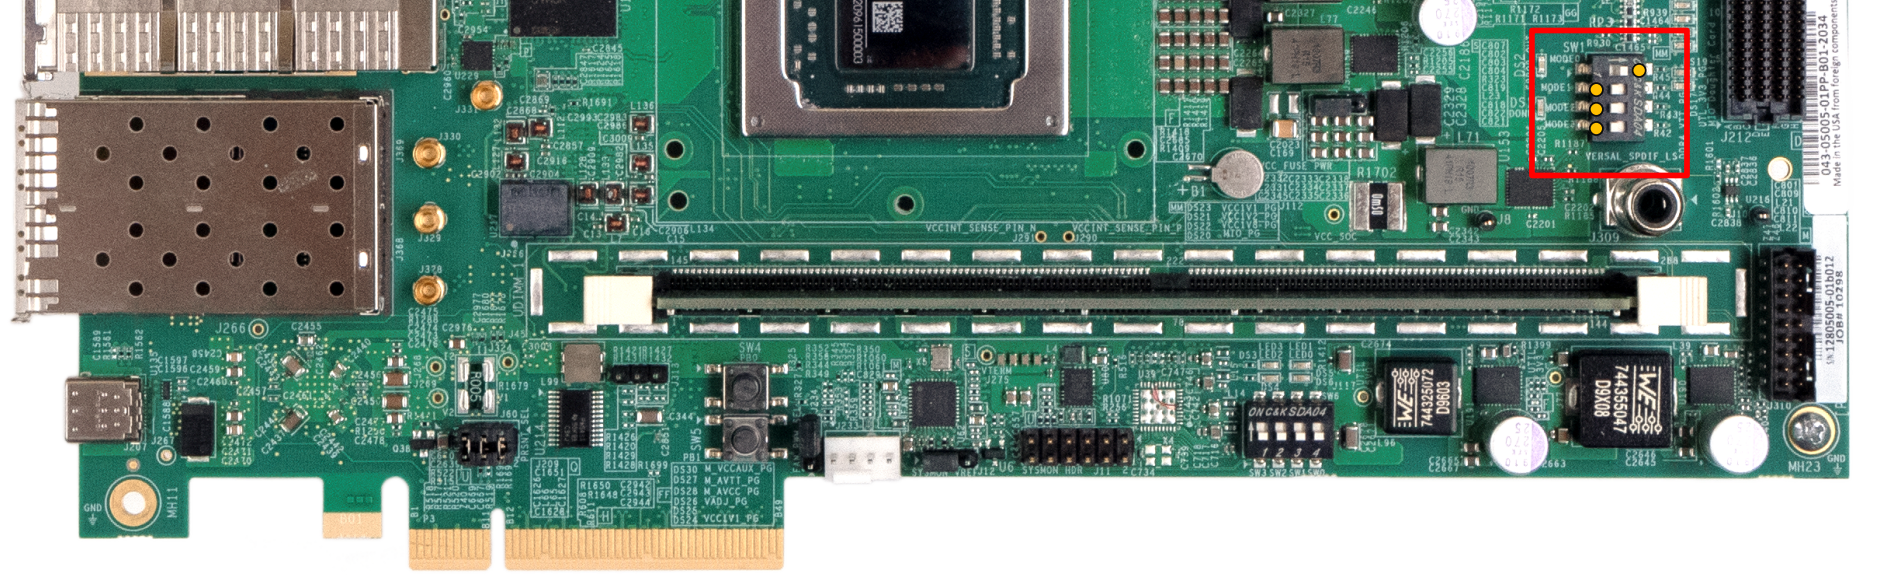
Now the newly created SD card can be used to boot the board. Make sure the boot switches are configured for SD boot.
For VCK190, right hand side (zoom in!):
Shortly after powering the board on PLM (and PSM) Firmware messages shall appear on the primary UART.
Continue with step 4 in the previous section.
Features
Crypto
The Versal OP-TEE port supports the following hardware-backed algorithms:
ECDSA Key Generation, Signature and Verification for NIST P-256, P-384 and P-521 curves
In contrast to Versal ACAP, Versal NET uses a dedicated PKI Accelerator hardware engine. Key generation for these algorithms makes use of a dedicated hardware TRNG.
AES-GCM for 128 and 256-bit keys
RSA 2048, 3072 and 4096
SHA3-384
GMAC
HMAC
TRNG
Other algorithms make use of ARMv8 Crypto Extensions where applicable
Subsystem PDI Loader
The Versal OP-TEE port includes a loader pseudo-TA that can be used to load
Subsystem PDI files, such as bitstreams for the Programmable Logic (PL):
#define PTA_VERSAL_LOADER_UUID { 0xa6b493c0, 0xe100, 0x4a13, \
    { 0x9b, 0x00, 0xbc, 0xe4, 0x2d, 0x53, 0xce, 0xd8 } }

/**
 * Load subsystem PDI
 *
 * [in]             memref[0]       Subsystem PDI buffer        (for VA operation)
 * [in]             value[0].a      HIGH part of 64-bit address (for PA operation)
 * [in]             value[0].b      LOW part of 64-bit address  (for PA operation)
 * [in]             value[1].a      Mode of Operation
 *
 * Return codes:
 * TEE_SUCCESS - Invoke command success
 * TEE_ERROR_BAD_PARAMETERS - Incorrect input param
 * TEE_ERROR_OUT_OF_MEMORY - Could not alloc internal buffer
 */
#define PTA_VERSAL_LOADER_SUBSYS    0x0

/**
 * PDI Loading Mode
 *
 * PTA_VERSAL_LOADER_MODE_VA - Load Subsystem PDI from virtual address
 * PTA_VERSAL_LOADER_MODE_PA - Load Subsystem PDI from physical address
 */
#define PTA_VERSAL_LOADER_MODE_VA   0x0
#define PTA_VERSAL_LOADER_MODE_PA   0x1

TEEC_Result load_subsyspdi(uint8_t *subsyspdi, size_t size)
{
    TEEC_Context ctx;
    TEEC_Session sess;
    TEEC_Operation op;
    TEEC_UUID uuid = PTA_VERSAL_LOADER_UUID;
    TEEC_Result ret = TEEC_SUCCESS;
    uint32_t origin;

    ret = TEEC_InitializeContext(NULL, &ctx);
    if (ret != TEEC_SUCCESS)
            return ret;

    /* Open a session with the TA */
    ret = TEEC_OpenSession(&ctx, &sess, &uuid,
                   TEEC_LOGIN_PUBLIC, NULL, NULL, &origin);
    if (ret != TEEC_SUCCESS)
            goto out;

    memset(&op, 0, sizeof(op));
    op.paramTypes = TEEC_PARAM_TYPES(TEEC_MEMREF_TEMP_INPUT,
                                     TEEC_VALUE_INPUT,
                                     TEEC_NONE,
                                     TEEC_NONE);

    op.params[0].tmpref.buffer = subsyspdi;
    op.params[0].tmpref.size = size;
    op.params[1].value.a = PTA_VERSAL_LOADER_MODE_VA;

    ret = TEEC_InvokeCommand(&sess, PTA_VERSAL_LOADER_SUBSYS,
                             &op, &origin);

    TEEC_CloseSession(&sess);
out:
    TEEC_FinalizeContext(&ctx);
    return ret;
}
The example above shows a load_subsyspdi() function that expects a buffer
(and its size) as its parameters. This buffer holds the actual Subsystem PDI
binary loaded from Linux filesystem for instance.
As indicated in the example code above, the pseudo-TA can also be instructed to
load from a physical address. In this case the first parameter to command
PTA_VERSAL_LOADER_SUBSYS comprises the high and low part of this physical
address as pure 32 bit values, instead of a memory reference. The second
parameter, called mode then has to indicate that by the value
PTA_VERSAL_LOADER_MODE_PA (instead of PTA_VERSAL_LOADER_MODE_VA).
Note
Subsystem PDI files loaded with the function load_subsyspdi() using mode
PTA_VERSAL_LOADER_MODE_VA have their size limited by the amount of
trusted shared memory available and OP-TEE kernel heap size
(CFG_CORE_HEAP_SIZE and thus CFG_TEE_RAM_VA_SIZE), since Subsystem
PDI files are copied as a whole from shared memory onto the kernel
heap to circumvent fragmentation and handover a single contiguous memory
block to PLM Firmware.
Mode PTA_VERSAL_LOADER_MODE_PA does not have this limitation, but
requires to have a potentially rather statically reserved area of main
memory!
NVM
The Versal OP-TEE port provides APIs to read and write eFuses to other OP-TEE OS
components. The API is available in core/include/drivers/versal_nvm.h and is
reflects the XilNVM server side IPI interface in terms of functions and their
parameters.
#include <drivers/versal_nvm.h>

static TEE_Result read_dna(uint32_t *dna)
{
    return versal_efuse_read_dna(dna, EFUSE_DNA_LEN);
}
#include <drivers/versal_nvm.h>

static TEE_Result write_black_iv(uint32_t *iv)
{
    struct versal_efuse_ivs ivs = { };

    ivs.prgm_blk_obfus_iv = 1;
    memcpy(ivs.blk_obfus_iv, iv, EFUSE_IV_LEN);

    return versal_efuse_write_iv(&ivs);
}
PUF
The Versal OP-TEE port provides access to the Physically Unclonable Function
(PUF) to other OP-TEE OS components. The corresponding API is available in
core/include/drivers/versal_puf.h and reflects the XilPUF server side IPI
interface in terms of functions and their parameters.
#include <drivers/versal_puf.h>

static TEE_Result register_puf(struct versal_puf_data *data)
{
    struct versal_puf_cfg cfg = { };

    cfg.puf_operation = VERSAL_PUF_REGISTRATION;
    cfg.shutter_value = VERSAL_PUF_SHUTTER_VALUE;
    cfg.global_var_filter = VERSAL_PUF_GLBL_VAR_FLTR_OPTION;
#if defined(PLATFORM_FLAVOR_net)
    cfg.ro_swap_value = VERSAL_PUF_RO_SWAP_VALUE;
#endif

    return versal_puf_register(data, &cfg);
}
OCP
On Versal NET devices only, the Versal OP-TEE port provides access to a subset of Open Compute Platform (OCP) features:
Device Management Endorsement (DME)
Platform Configuration Register (PCR) extension support
Device Key Management and Attestation
Generation of self-signed DevIK X.509 certificate and DevAK X.509 certificate signed with DevIK.
The corresponding API is available in core/include/drivers/versal_ocp.h and
reflects the XilOCP client side API in terms of functions and their
parameters.
Note
Unlike functions in the XilOCP client API, some - not all - functions in
this OP-TEE OCP API use multiple individual arguments instead of a single
argument pointing to a specific C struct with multiple members. Also in
contrast to XilOCP client side API: if a buffer for input or output data
needs to be specified, there is always the need for specifying its size in
bytes, unless the buffer is supposed to be a single item of a certain type.
#include <drivers/versal_ocp.h>

static TEE_Result extend_and_read_hwpcr(uint8_t *hash, size_t size)
{
    TEE_Result ret = TEE_ERROR_GENERIC;

    ret = versal_ocp_extend_hwpcr(VERSAL_OCP_PCR_2, hash, size);
    if (ret != TEE_SUCCESS)
        return ret;

    return versal_ocp_get_hwpcr(0x4, hash, size);
}
Memory Map
By default the build system and the various configuration files are setup, partially rather hard-coded, to follow the memory maps shown in this part for loading the individual software components to main memory (DDR RAM).
Versal ACAP
Base Address |
Size |
Loaded by |
Loaded from |
Description |
|---|---|---|---|---|
0x00001000 |
127k |
PLM |
|
DTB for U-Boot (and, if necessary Linux) |
0x08000000 |
PLM |
|
U-Boot |
|
0x20000000 |
512M |
PLM |
|
pure Linux kernel or U-Boot FIT image (comprising kernel, DTBs, ramdisk) |
0x60000000 |
256M |
PLM |
|
OP-TEE system |
0x70000000 |
128M |
PLM |
OP-TEE static shared memory |
|
0x78000000 |
128M |
assumed to be reserved by Linux |
||
0xFFFE0000 |
128k |
PLM |
|
ATF (in OCM, not DDR) |
0x00800000 |
248M |
U-Boot |
FIT image |
Linux kernel |
0x10000000 |
2M |
U-Boot |
FIT image |
DTBs |
Hint
Since a typical PetaLinux BSP for Versal ACAP does not come with a DTB
including reserved-memory nodes for OP-TEE system and static shared
memory (0x60000000 - 0x77FFFFFF), the build system is setup (hard-coded) to
include such nodes using the Device Tree Overlay in
optee-project/build/versal/versal-optee-mem.dtso in the U-Boot FIT
image.
Versal NET
Base Address |
Size |
Loaded by |
Loaded from |
Description |
|---|---|---|---|---|
0x00000000 |
256M |
assumed to be reserved |
||
0x22200000 |
39M |
PLM |
|
OP-TEE system |
0x24900000 |
25M |
PLM |
OP-TEE static shared memory |
|
0x26200000 |
1M |
PLM |
|
ATF |
0x26300000 |
14M |
PLM |
|
U-Boot |
0x27100000 |
512k |
PLM |
|
DTB for U-Boot (and, if necessary Linux) |
0x27200000 |
398M |
PLM |
|
pure Linux kernel or U-Boot FIT image (comprising kernel, DTBs, ramdisk) |
0x78000000 |
128M |
assumed to be reserved by Linux |
||
0x40000000 |
2M |
U-Boot |
FIT image |
DTBs |
0x40200000 |
U-Boot |
FIT image |
Linux kernel |
Danger
Since it is (hereby declared) customary to already have a DTB with all
required reserved-memory nodes in place, as part of the BSP, on Versal
NET boards, the build system is not setup to add any such nodes!
Known Issues
Authenticated Encryption - RAM requirements
The existing implementation of Authenticated Encryption can require an unusually high amount of OP-TEE kernel heap memory depending the number of “update” calls. Per call to the following “update” functions, without “freeing” the operation handle in between, the specified quantity of memory is allocated until the end of the operation handle’s lifetime:
TEE_AEUpdate()- (120 + 64 + (<payload-size> * 2)) BytesTEE_AEUpdateAAD()- (120 + 64 + <aad-size>) Bytes
The reason for this lies in the support for TEE_CopyOperation() and the
creation of a “replay” list: Only a single, truly independent, operation handle
can be “active” (TEE_AEInit() called on it) at the same time. However,
TEE_CopyOperation() on that “active” operation handle is supported. Until
all but a single one of these copies have been finished
(TEE_FreeOperation()), only TEE_AEEncryptFinal() is allowed on them. To
support that, each update (TEE_AEUpdate*()*) is recorded on the heap, to
then be able to “replay” them after one copy of the operation handle has been
finished and before the next one can be finished, if any.
xtest regression 4005.7 and following
Concerns Authenticated Encryption.
Subcases 4005.7 and following subcases are known to fail since they involve zero
length payloads handed over to TEE_AEEncryptFinal(), which is not supported
by module XilSecure in PLM Firmware. The problem specifically lies in the PMC
DMA engine driver code (function XSecure_AesPlatPmcDmaCfgAndXfer()), which
does not allow zero length payloads, but is called for any payload length.
Note that the Versal OP-TEE currently catches cases of zero length payload and
does not even bother to call out to PLM Firmware (function update_payload()
in core/drivers/crypto/versal/authenc.c).
xtest regression 4017.9 and 4017.10
Concerns Authenticated Encryption.
Subcases 4017.9 and 4017.10 are known to fail since they involve calling
TEE_AEInit() after TEE_AEEncryptFinal(). As per the TEE Internal Core
API Specification v1.3.1, page 216 this should be possible. However the Versal
OP-TEE port does currently not allow this
(core/drivers/crypto/versal/authenc.c). Rather small research and
experiments with module XilSecure of PLM Firmware leave doubts whether this can
be supported at all, unless PLM Firmware is updated.
Furthermore, it looks like subcases 4017.9 and 4017.10 are going to trigger
alignment issues on Versal ACAP only should the above issue be solved one
day. Module XilSecure in PLM Firmware expects payloads to be aligned to 4 Bytes
for regular updates (TEE_AEUpdate()) and 16 Bytes for final updates
(`TEE_AEEncryptFinal()). This can be observed in XilSecure code, function
XSecure_AesValidateSize().
PLM Firmware for Versal NET device does not have this limitation regarding payload sizes!
Note that the Versal OP-TEE currently catches cases of unaligned payload sizes
on Versal ACAP and does not even bother to call out to PLM Firmware (function
update_payload() in core/drivers/crypto/versal/authenc.c).
xtest pkcs11 1030
Concerns Authenticated Encryption.
Case 1030 is known to fail since it runs into the same issue as xtest regression 4005.7.